Sense HAT Introduction
Introduction to Sense HAT projects
A couple of months ago I wrote two posts about Raspberry Pi and Python (Docker and Oh My ZSH). At the same time, I bought Sense HAT to play a little bit with it. The first thing, besides modification to my RasPi case, was a coding tutorial that took me through basic concepts of the hardware while I was creating a classic Slug game (probably known under a different name).
Once I’ve managed to complete it I decided to write another classic myself. Here you can find my “Sense Racing” tutorial.
This tutorial requires basic Python or generic programming knowledge
Getting started with Sense HAT
In any Sense HAT project (or tutorial) you would need either:
- Raspberry Pi
- Sense HAT
- Preferably the latest version of Raspbian
- Python3
- Sense HAT for Python3
sudo apt-get install sense-hat
Or
Code
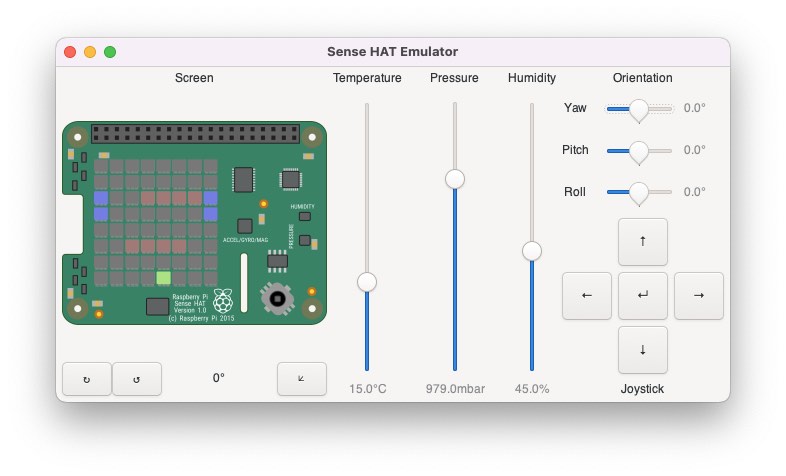
Every project needs to be started with either sense_hat or sense_emu library import. In my code I’m doing it like this:
from sense_hat import SenseHat
# from sense_emu import SenseHat
Where one of them needs to be always commented out and by default sense_hat is the active one. It allows an easy switch between the production environment (actual Sense HAT) and the development environment (Sense emulator).
Game Concept
Before we will step into further implementation let’s define how the game should look like. So here is our project definition.
- We will have a car (single pixel) driving on the straight track with some obstacles appearing on the road as we move forward.
- The car will be able to move left and right in the bottom row, by pressing left and right keys.
- Hitting any obstacle will end the game.
- Points are based on the distance we make.
- We can accelerate speed for a short time by pressing the up key.
- Base speed will increase based on game time.
Drawing Track
As everything on Sense HAT 8x8 display our graphic will be simplified to the maximum. Objects will be represented by different colour pixels, lets first define all colours that we need:
-
blankfor background -
border_colourfor track borders that will create an illusion of movement -
car_colourso we know where we are -
obstacle_colourand of course things we don’t want to hit
All colours are defined as (R,G,B) in the range 0 - 255 here are mine:
blank = (0, 0, 0)
border_colour = (0, 0, 200)
car_colour = (100, 200, 0)
obstacle_colour = (100, 0, 0)
Race is a completely different concept to Slug, our car will be moving by not moving at all. The background has to move downwards. In such case we have to “remember” the state of each point on the screen and move it one row down and then create a new row of tracks at the top. As shown in the image below, in the next step first row becomes second, the second becomes third and so on. Only the car stays always at the bottom.

To achieve that we have to always redraw the whole screen (like in a classic CRT screen), so we have to create a matrix that will keep the value of each pixel and at the beginning, we will fill it with our background colour. As well as we have to define distance and startup SenseHat().
track = [[blank for x in range(8)] for y in range(8)]
distance = 0

sense = SenseHat()
Now any movement will be achieved by simple operations on track matrix.
It’s time to create an actual drawing function, as an argument we will take our track matrix.
def draw(matrix):
    matrix.reverse()
    flat_list = [item for sublist in matrix for item in sublist]
    sense.set_pixels(flat_list)
To refresh the state of pixels we will use built-in sense.set_pixels() which argument is a vector of rows from one the eight put one after another. So we have to convert our 8x8 matrix into 64 elements vector:
flat_list = [item for sublist in matrix for item in sublist]
And what is most important here, as we want our car to move forward by actually moving the background backward we have to reverse the matrix.
Generating Track
We already have a function that will draw a frame based on a given matrix of values. It’s time to generate some track:
def gen_track():
    line = [blank for x in range(8)]

    if distance % 4 > 1:
        line[0] = border_colour
        line[7] = border_colour

    return line
This function generates a single line, which later on will be put at the end (so after a reverse at the beginning) of the matrix. At the moment it’s just an empty line generated in the same way as the initial matrix [blank for x in range(8)].
Then it generates track borders in two of four cycles distance % 4 > 1 this can be changed later if you desire a different pattern of track border.
Finally, we have to use all created functions:
if __name__ == '__main__':
    while True:
        track.append(gen_track())
        draw(track[distance:distance + 8])

        distance += 1
	sleep(0.5)
The game needs to happen in the infinite loop, every time frame we will append a track with a new line generated by gen_trac() and we will draw the last 8 rows of it. Then we have to increment distance which tells the program how far we moved on the track and to slow down cycles a little bit we will use sleep(0.5) the actual value can be adjusted to your needs. Don’t forget to add import:
from time import sleep
If you run this and you have everything set up correctly you should see in your emulator track moving forward. Now you can try commenting out matrix.reverse() reverse line and see the effect.
This will be continued in the next post.
Everything together:
- Category:
- Raspi